

I saw this bed on-line at a full-size furniture site and thought it would be a good candidate for card stock. For this tutorial I am making a twin size. You can adjust the size for whatever you need, the instructions would be the same. I hope to have a picture of it painted by the end of this blog, I am waiting for the glue to dry.
We are going to make the mattress and box spring first. I was lucky when I found this fabric, I shop Goodwill for fabrics I can use. I saw this shirt and thought, "mattress".

For the box spring cut 3 pieces of foam core. I am showing the label of the foam core I use. Cut the foam core 3-1/4" (82mm) x 6-1/4" (16 cm). Glue them together, I use tacky glue. For the mattress cut 2 pieces of foam core 3-1/4" (82mm) x 6-1/4" (16 cm). Glue them together, also.

This is my box spring and mattress.
Trace around the bottom of the box spring onto card stock, cut out the
card stock.
Ever so slightly round the corners of the mattress and box spring by rocking them on your table. Just take the sharpness off.

Apply glue stick to the card stock. (**TIP: I use a piece of computer photo paper to set my card stock on when I am applying the glue stick. For some reason glue dries on the photo paper and you can use it forever without it being sticky.)
Glue the card stock to your fabric.

Glue the card stock to the bottom of the box spring using a tacky glue, I am showing you what I use.

Apply tacky glue to the sides and glue the fabric to the sides. Glue the corners together and clip them off.

Measure the width of your box spring and cut card stock just a bit narrower. Cut enough card stock to go all around the box spring.
If you have to glue pieces of card stock together to get your length use yellow carpenter's glue. I sand the seams a bit to smooth them out. Dry fit your length.

Apply glue stick to the card stock. I am using my photo paper so I can get the edges glued without getting glue on my table.
Glue the card stock to your fabric.

Clip the corner from each side.

Glue one long side up using the tacky fabric glue.
Clip the fabric like I have in the picture for both ends.

Turn the ends to the card stock and glue down.

Apply tacky fabric glue to the sides of the box spring and glue the card stock on.
Be careful when you are doing this, don't pull the card stock, it will stretch and become longer than you need.

I've made my ends meet on the end.

Clip "V" notches at the corners and glue the extra fabric down.
Set the box spring aside.

Place the mattress on a piece of poster board and trace around. Cut the poster board out.
Do the same with a piece of card stock. Apply glue stick to the card stock and glue your fabric to it. Glue the card stock to the mattress using fabric tacky glue.

Use tacky fabric glue to glue the extra fabric to the sides of the mattress. Glue the corners together and cut off.

For making the mattress soft I am using Thermolam Plus. It's a firm, dense batting I buy from the bolt at Joann's. I am showing a picture of the thickness.
Cut 3 pieces of Thermolam Plus. The first piece is about 1/8" smaller all around, the second piece fits to the edge and the third piece is slightly larger, to be trimmed later.

I want you to get started on your buttons now. Dampen a piece of card stock, best way: lay it between layers of damp paper towel.
After it's damp use a 1/8" paper punch and punch at least a 12 circles.

Lay the damp circles onto a couple of layers of craft foam and use a stylus to shape them. The one I am using is from Micheal's and is a large ball stylus. I used the smaller end.
Push the circles into the foam and let them dry. Set this aside.

See how I am really pressing the circle into the foam?
When the circles dry they will retain their shape better than if you just used dry card stock to start with.

Mark on your poster board where you want your buttons to be. For this size I used 10 buttons, 5 on each side.
Turn the poster board over and use tacky fabric glue to glue the smaller piece of Therolam Plus and the second piece that just fits to the poster board. (My picture was blurred, so I am talking you through this.) Lay the larger piece on top. Now, lay this assembly onto your fabric and cut out, leaving extra all around to glue onto the sides of the mattress.

I used a doubled thread with a knot and starting from the poster board side with the marks I sewed through all layers and came back to the poster board side. I did this twice for all of the marks. I pulled tight and went to the next mark. I knotted off when I ran out of thread and started again.

This is the top of the mattress with the button dimples sewn in.
Trim the Thermolam Plus even with the poster board.

Using the fabric tacky glue, glue the mattress top to the mattress foam core.

Apply fabric tacky glue to the sides of the mattress and glue the extra fabric down. Glue the corners together and clip off.

We're getting there.

Measure the corner of the mattress for the width of the card stock that will be glued onto the sides.
Cut the side from card stock, cut it slightly narrower than your measurement. Dry fit for length, glue pieces together if you have to.

Apply glue stick to the card stock and glue the fabric to it.
Clip the ends as I have them in the picture.

Using the fabric tacky glue I've glued all four sides to the back onto the card stock.

Glue the side to the mattress using the fabric tacky glue.

This maybe a repeat for some of you for piping instructions.
Cut a piece of your fabric on the bias.
I had to glue my fabric together to get a piece long enough to go around my mattress.

Cut a piece of crochet thread the length you need for your mattress.
Apply fabric tacky glue to the edge of the fabric. Smear it toward the edge.

Lay the crochet thread on the glue.
Press the crochet thread into the glue.

This is where my directions have changed a bit.
Carefully fold the edge over the crochet thread. Be sure you get the crochet thread in the fold.
Press the fabric down with your hand.

Run your fingernails along and into the crochet thread. This seals the fabric together, press hard and pull toward the edge with your fingernails. Turn the fabric over and do the same thing on that side. Turn the fabric over back to the beginning and do the same thing.

Use sharp scissors and cut the piping from the fabric.
When you are cutting, cut very close, slightly pulling with the scissors against the piping.

Roll the piping on your table to make it round. Press hard to seal the glue even more.

To make another piece cut away the glued edge and start again. We need a piece for top and bottom.

Glue the piping into the seam where the side is glued on. Use the fabric tacky glue.
Later in the tutorial I have a note about where to get precision glue bottles.

Glue the next piece to the bottom of the mattress.
Almost done.

I painted my buttons. I wrapped tape around a piece of wood, the tape having the sticky side up. Used my tweezers to set my buttons on the tape.

I used an off-white I mixed using Delta's PermEnamel. Let Dry.

Apply fabric tacky glue into the dimples on the mattress and set your buttons.
At this point you can use this mattress as a prop in an attic scene.
You can glue to mattress and box spring together.
Or you can leave them separate to put into a bed for dressing. I would make a fitted bottom sheet and then glue the 2 together and then continue to dress the bed.

On to the bed. Transfer the patterns to a program that lets you change sizes. The dimensions of the head board are: 3-7/8" (98mm) wide and 3-7/8" (87mm) tall. When the head board is the size I've written on the pattern the foot board pattern will be also correct.
If you don't use the computer to make your pattern the foot board size is below.
To make the form/mould for the foot board I first drew a rectangle 3/4 inch by 3 5/8 inch onto card stock. I used my circle template to draw the corners as you see above. Cut the card stock pattern out and trace it onto foam core. I used 5 pieces and a piece of mat board, too. Cut all of this out and glue and stack these pieces for the form/mould for the foot board.

Use the foot board pattern to trace onto scraps of foam core a mould we will use to shape the foot board.
I have glued and stacked five pieces of foam core together. If you want you can glue card stock onto the curved edge to even up this side.

Cut 3 pieces of card stock 4-3/4" (121mm) x 1-1/2" (38).
Using yellow carpenter's glue to glue these 3 pieces together, I have 2 pieces glued together in the picture.

Bend the 3 pieces around the foot board mould and hold with rubber bands.
Let this dry over night.

Trace the head board pattern 3 times and cut out.

Glue using yellow carpenter's glue, glue the 3 head board patterns together.
Smooth the surface with your hand.
Use yellow carpenter's glue to glue the rest of the bed together.
Another tip: always, always dry fit before gluing.

Cut from mat board 8 pieces 3-11/16" (94mm) x 1/4" (7mm) for the bed posts.
Glue these together, 2 each. When you are finished you should have 4 pairs glued together.

Glue the posts to the head board by gluing 1 pair in back and 1 pair in front. Glue the leg together below the head board and clamp until dry.
Make sure the posts are flush with the edge of the head board.

Measure between the posts and cut 3 strips of card stock 1/2" (13mm) wide.
Glue them together and then glue them to the bottom of the head board.

Measure 7/8" (22mm) up from the top of the card stock strip you just glued on and make a mark on each side.

Cut 3 strips of card stock to fit between the posts, 5/16" (8mm) wide.
Glue the strips together and glue this strip onto the head board on top of the marks you made leaving 7/8" between the two strips of card stock.

Trace the top of the head board pattern onto card stock.
Measure 1/4" (7mm) down from the top edge and draw a new line.
Cut this new pattern out.
Trim off 1/4" (7mm) each side, (that's where the posts are).
Dry fit this pattern on the head board and trim if needed.

Trace 3 of these new patterns onto card stock.
Glue these pieces together.

Dry fit before gluing, glue the top curve onto the head board.

For added surface decoration I cut 3 more top curve patterns and then trimmed them narrower. I then glued these onto the top curve one at a time.

It's the next day!!
Remove the foot board from the mould.
Cut 16 pieces of mat board 1-1/2" (38mm) x 1/4" (7mm).
Glue them together in pairs just as you did for the head board posts.
When you're finished you should have 8 pairs.

In this picture I have all ready glued on a bed post on the inside of the foot board. Don't do that just yet.
I want you to cut out a little of the foot board before gluing the posts on.
At the bottom of each side cut a notch, 1/8" (3mm) x 1/2" (13mm).

Next, I want you to glue a pair of posts to the inside of each end of the foot board. Make sure the edges are flush.
Cut 2 side boards from mat board 1/2" (13mm) x 6" (153mm).
Glue 1 side board into each notch.

Now, you can glue the other pair of posts to the outside of each side of the foot board.
Clamp until dry.

When the end posts are dry you can remove the clamps.
Glue on the other pairs of posts just after the curve of the foot board.
These next few pictures are of what I did before it dawned on me that the EASIER route would be to use toothpicks as a base for the legs. Cut the toothpicks 1" (2.5cm) long. Measure the legs of the head board, they should be 5/8", but you measure your legs to be sure. Mark that length on your toothpick. Next, measure 1/16" down from that mark and make another mark. This new mark is where the paper will be glued for the winding.

On to what I did.
I cut "Q"Tips to 5/8", the length of my legs.

I've made the mark for where I will glue the paper for winding.

The legs are "decorative turnings", we are going to make them with paper.
Cut a piece of paper 6" (153mm) wide. Now, measure 5/16" (8mm) at the top left corner, mark.
Lay a straight edge at this mark and to the bottom left corner. Cut this with your craft knife.

For the next triangle measure 5/16" at the bottom left corner, mark. Use the straight edge and cut to the top left corner.
Make 4 triangles.

You started with a straight edge on your paper, so your triangles have one straight edge and one slanted edge. I marked the straight edge with an "x".
My triangles.

Glue the triangle onto your leg. You will have a toothpick with 2 marks 1/16" apart. Glue the top straight edge to that second mark you made on your toothpick.
Is this too confusing, I am sorry.

Apply a little glue to the paper and wind, keeping the top even.
With the straight edge on one side of the triangle we were able to keep the top even and get this shape.

In this picture you can see I've added more paper.
I cut paper 1/16" and a little wider, not an 1/8", just a little wider than a 1/16".
I glued the paper as I wound 5 to 6 times around the leg.

This is where I thought, "Gee, I should have used toothpicks to start with."
I drilled a hole into the top of the leg I made and glued a toothpick into that hole. We have to dowel the legs on, butt gluing won't do for legs.

This is what your legs should look like.
I have my toothpicks a little longer that an inch here.
Can you see the 1/16" at the top where the "Q"Tip stops and the toothpick starts?

I've drilled holes into the bottom of the posts to receive the legs.
I want you to dry fit the legs before gluing. You can shorten your toothpicks a bit, but glue at least 1/4" into the post.
Do you see that I have the 1/16" space between the post the the first "decorative turning"?

Cut 2 strips of mat board about 5/16" (8mm) wide and 5-7/8" (149mm) long. These are the bed rails.
Dry fit these before gluing in, they should be even with the end of the side boards. Butt glue these to the side boards. Let this dry.

Cut yourself some 1/4" wide strips, I've cut too many here. I went crazy with my paper cutter.

These strips are glued to the foot board, top and bottom on the outside and to the top on the inside.
Cut and dry fit these strips before gluing. Glue on the layers one at a time, glue on 3 layers.

Showing the inside of the foot board.

I've cut some narrower strips, they are probably 1/16". I cut them by eye.

These narrower strips are glued on one at a time, 3 layers just as you did for the wider strips. Be sure to dry fit before gluing.

I have found a place on-line to buy some great precision glue bottles and tips.
www.quilledcreations.com
The tip on the right does not come with a bottle, but I think it will fit onto the smallest Tacky Glue bottle. Use up the glue and put the new tip on for your carpenter's glue.

To cover the layers of card stock I cut a strip of card stock and glued this onto the edge of the head board and posts.
I also cut a strip to cover the edge of the side of the head board's posts.

I traced the top of the foot board onto card stock for a cover. Cut out and trim and dry fit.

I trimmed the card stock and glued it onto the top of the foot board.
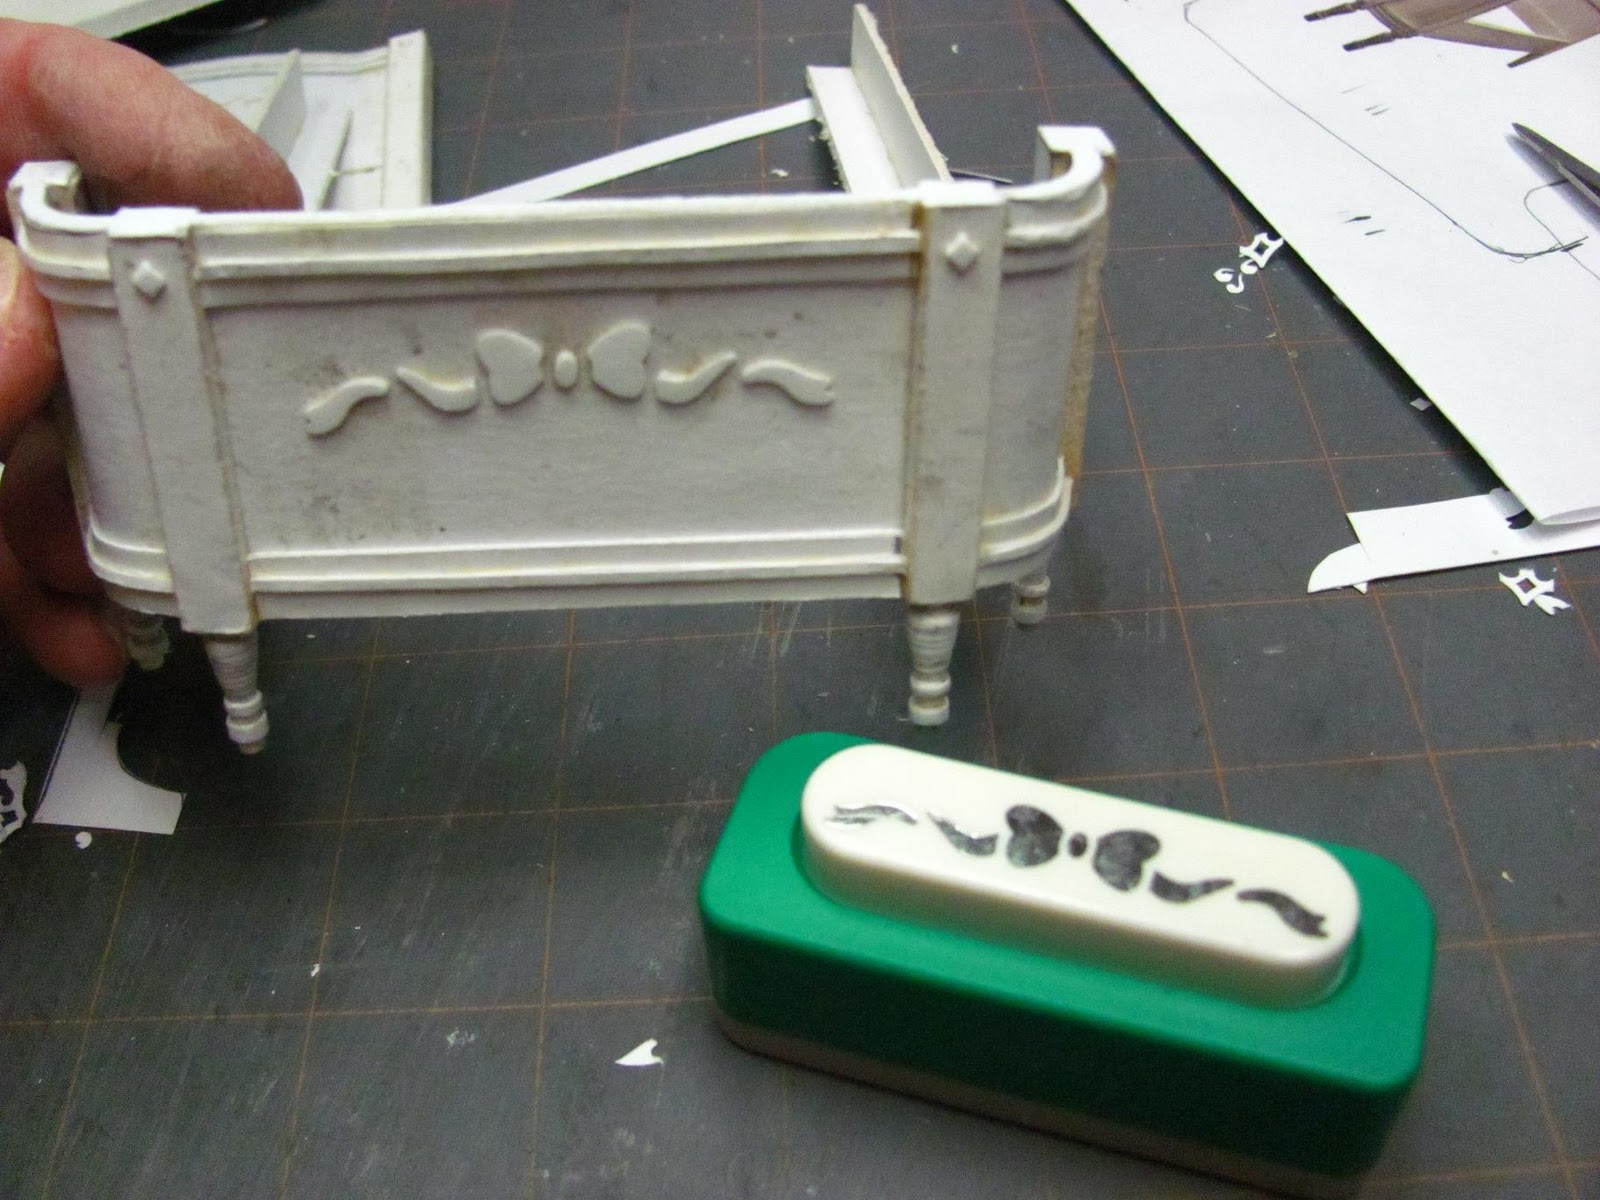
I used a boarder punch I had for the surface decoration on the foot board and head board.
I also added a diamond on the top of each post.
I punched 3 of everything and glued on each layer separately.

I'm using toothpicks for the knobs for the top of the posts, yippee!
I cut off the pointed tips of the toothpicks and sanded them round.
You will make 6 knobs. I cut the toothpicks in half.

We are going to wind paper around the toothpicks. These triangles will have both sides slanted.
To do this cut a piece of paper 8" (203mm) wide.
From the top left corner measure 1/4" (7mm). Use a straight edge from this mark to the bottom left corner and cut the first triangle, discard this one.
Measure from the top rounded end of your toothpick 1/16" and mark. Glue the wide end of the triangle to the toothpick and start winding, adding a little glue as you go.

I've drilled holes in the top of the posts for my knobs. Dry fit first then glue the knobs in.

Glue the head board to the side board/bed rails.
From the picture you can also see I've glued pieces of mat board to fit between the rails to hold more of the mattress.

I don't like butt gluing, you don't have much surface that is glued, it won't hold well.
I scored and folded a piece of card stock and glued it into the corner where the side board is glued to the head board. This will help the head board stay on a little better.

Let the bed dry before you start painting.
I don't think this bed takes any real skill to make. As with anything in miniatures it takes time and patience. The bed and mattress/box spring took me 2 days to make, painting not included. I think it will be a real special piece in your miniature bedroom.

I've got the bed painted. I painted the whole thing Delta's Magnolia White and I used acrylic gesso to fill in the lines on the legs and knobs. I sprayed the whole thing with a satin clear finish. I used Delta's Lisa Pink and mixed a glaze with it to paint around on the bed. Then I took a dark brown and glaze and dabbed in the corners and cracks. After that I took some 400 grit sandpaper and sanded around where I thought it needed it. I sprayed the whole thing with a clear satin spray, and it's done!
I do hope you try this out, it's not hard to do. It would make a great club project, too.
Have a Merry Christmas, Happy Holidays, too
Have fun, expand on it, make it better, just keep making minis.
Kris
P.S. if you want to see where I got the idea, www.thepepperkids.com under furniture, the country french bed. You'll be able to make the rest of the furniture for the room.